自主部署代理 不用搭环境,自己有境外 的vps就行,最好是openai支持的地区的vps,下载bin里面的执行文件 直接就能跑,最简单的api proxy方式,最重要的是支持SSE,让客户端请求时响应得更加迅速,也提供了golang的源码 ,需要定制的可以自行完善。
1 ./api_proxy -daemon -port 9000
docker的部署方式,直接拉镜像部署,不用自己配置环境,这种自主部署的代理可以支持sse,使用nodejs的可以参考:
1
2
3
4
5
6
7
8
9
10
11
12
13
14
15
16
17
18
19
20
21
22
23
24
25
26
27
28
29
30
31
32
33
34
35
36
sudo yum remove dockersudo yum install -y yum-utilssudo yum-config-manager --add-repo https://download.docker.com/linux/centos/docker-ce.reposed -i 's+https://download.docker.com+https://mirrors.tuna.tsinghua.edu.cn/docker-ce+' /etc/yum.repos.d/docker-ce.repo sudo yum install docker-ce docker-ce-cli containerd.iosudo systemctl start docker sudo curl -L "https://github.com/docker/compose/releases/download/1.29.2/docker-compose-$(uname -s) -$(uname -m) " -o /usr/local/bin/docker-composechmod +x /usr/local/bin/docker-composeln -s /usr/local/bin/docker-compose /usr/bin/docker-composeyum install libxcrypt-compat mkdir -p /etc/systemd/system/docker.service.dtouch /etc/systemd/system/docker.service.d/proxy.conf[Service] Environment="HTTP_PROXY=http://proxy.example.com:80" Environment="HTTPS_PROXY=https://proxy.example.com:443" systemctl daemon-reload systemctl restart docker docker pull python:3-slim docker run -dit --name proxy -p 9000:9000 easychen/ai.level06.com:latest wget https://github.com/Yidadaa/ChatGPT-Next-Web/archive/refs/tags/v1.7.1.tar.gz tar -xzvf v1.7.1.tar.gz cd ChatGPT-Next-Web-1.7.1docker build . docker tag IMAGEID(镜像id ) REPOSITORY:TAG(仓库:标签) docker login docker push nephen2023/chatgpt-next-web
openai安装 1 2 3 4 5 pip3 install openai pip3 install --upgrade openai # 从 https://pypi.org/project/openai/#files 下载openai-0.27.0-py3-none-any.whl 然后安装: # ERROR: Package 'openai' requires a different Python: 3.6.8 not in '>=3.7.1' pip3 install openai-0.27.0-py3-none-any.whl
python测试流式输出:
1 2 3 4 5 6 7 8 9 10 11 12 13 14 import osimport openaiopenai.api_key = "" openai.api_base = "https://api.openai.com/v1" for resp in openai.ChatCompletion.create( model="gpt-3.5-turbo" , messages=[ {"role" : "user" , "content" : "hello" } ], stream = True ): if 'content' in resp.choices[0 ].delta: print (resp.choices[0 ].delta.content, end="" , flush=True )
客户端使用 以 https://www.npmjs.com/package/chatgpt 为例
1 2 3 4 5 6 7 8 9 10 11 12 13 14 15 16 17 18 19 20 21 22 23 24 25 26 27 28 chatApi= new gpt.ChatGPTAPI ({ apiKey : 'sk.....:<proxy_key写这里>' , apiBaseUrl : "http://localhost:9001" , }); const api = new ChatGPTUnofficialProxyAPI ({ accessToken : process.env .OPENAI_ACCESS_TOKEN , debug : false }) const prompt = '写一首关于猫的诗词' const res = await api.sendMessage (prompt, { onProgress : (partialResponse ) => { process.stdout .write (`\r${partialResponse.text} ` ); } })
undetected_chromedriver 一种取巧的方式绕过Cloudflare v2验证,感谢林伟源 大佬。
这个库是如何做到不被检测出来的,它在启动的时候修改了 driver 的一些数据,在运行时可以看到会打印在 console 里:https://github.com/ultrafunkamsterdam/undetected-chromedriver/blob/master/undetected_chromedriver/__init__.py#L246 https://github.com/ultrafunkamsterdam/undetected-chromedriver/blob/master/undetected_chromedriver/patcher.py#L91-L99 https://github.com/ultrafunkamsterdam/undetected-chromedriver/blob/master/undetected_chromedriver/patcher.py#L222-L228
1 2 3 4 5 6 7 8 9 10 11 12 13 14 15 16 17 18 19 20 21 ./undetected_chromedriver --help Usage: ./undetected_chromedriver [OPTIONS] Options --port=PORT port to listen on --adb-port=PORT adb server port --log-path=FILE write server log to file instead of stderr, increases log level to INFO --log-level=LEVEL set log level: ALL, DEBUG, INFO, WARNING, SEVERE, OFF --verbose log verbosely (equivalent to --log-level=ALL) --silent log nothing (equivalent to --log-level=OFF) --append-log append log file instead of rewriting --replayable (experimental) log verbosely and don't truncate long strings so that the log can be replayed. --version print the version number and exit --url-base base URL path prefix for commands, e.g. wd/url --readable-timestamp add readable timestamps to log --enable-chrome-logs show logs from the browser (overrides other logging options) --bidi-mapper-path custom bidi mapper path --disable-dev-shm-usage do not use /dev/shm (add this switch if seeing errors related to shared memory) --allowed-ips=LIST comma-separated allowlist of remote IP addresses which are allowed to connect to ChromeDriver --allowed-origins=LIST comma-separated allowlist of request origins which are allowed to connect to ChromeDriver. Using `*` to allow any host origin is dangerous!
在本地测试的时候可以使用 undetected_chromedriver –allowed-ips=”” –allowed-origins=”*” 来启动,公网要考虑风险。
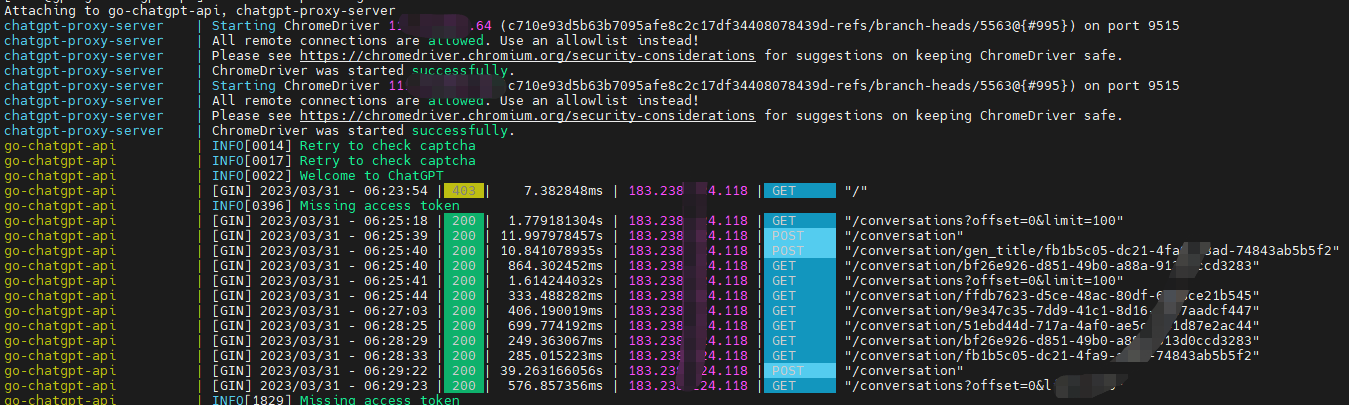
打包了一个 Docker 镜像:linweiyuan/chatgpt-proxy-server,开箱即用。尝试过用 Alpine,硬是缺少一些库,于是用回熟悉的 Arch,只是最终镜像有 1G+
1 2 3 4 5 6 7 8 9 10 11 12 13 14 15 16 17 18 19 20 21 22 23 24 25 26 27 28 29 30 31 32 33 34 35 36 37 38 39 40 41 42 43 44 45 46 47 48 49 services: chatgpt-proxy-server: container_name: chatgpt-proxy-server image: linweiyuan/chatgpt-proxy-server ports: - 9515:9515 restart: unless-stopped logging: driver: "json-file" options: max-size: "500m" max-file: "1" environment: - LOG_LEVEL=INFO `` 利用 [undetected_chromedriver](https://github.com/ultrafunkamsterdam/undetected-chromedriver)绕过 Cloudflare 403,监听 9515 端口,通过原生 JS 发送 XHR 来进行通信,有人写了安装指南https://github.com/dqzboy/ChatGPT-Porxy/blob/main/install/chatgpt-proxy.sh。 ```xml FROM archlinux ENV SUDO_USER_NAME linweiyuan ENV MIRROR_URL 'https://mirrors.bfsu.edu.cn/archlinux/$repo/os/$arch' RUN echo "Server = ${MIRROR_URL}" > /etc/pacman.d/mirrorlist \ && pacman -Sy --needed --noconfirm \ && pacman -S base-devel git --needed --noconfirm \ && useradd -m ${SUDO_USER_NAME} \ && echo "${SUDO_USER_NAME} ALL=(ALL) NOPASSWD: ALL" > /etc/sudoers \ && su ${SUDO_USER_NAME} -c 'cd \ && git clone https://aur.archlinux.org/google-chrome.git \ && cd google-chrome \ && source PKGBUILD \ && sudo pacman -Syu --asdeps --needed --noconfirm "${makedepends[@]}" "${depends[@]}" \ && makepkg -sir --noconfirm \ && cd \ && git clone https://github.com/ultrafunkamsterdam/undetected-chromedriver \ && cd undetected-chromedriver \ && sudo pacman -S --needed --noconfirm python python-setuptools \ && sudo python setup.py install \ && (python example/example.py &) \ && while true; do [ -f ~/.local/share/undetected_chromedriver/undetected_chromedriver ] && sudo cp ~/.local/share/undetected_chromedriver/undetected_chromedriver / && break || sleep 1; done \ && cd \ && sudo rm -rf google-chrome undetected-chromedriver \ ' \ && pacman -Rs --noconfirm python-setuptools python git base-devel \ && rm -rf /usr/lib/python* \ && echo -e "y\nY" | pacman -Scc CMD ["./undetected_chromedriver", "--allowed-ips=", "--allowed-origins=*"]
基于go的api实现:go-chatgpt-api go-chatgpt ,使用的时候要设置环境变量
1 2 export SERVER_URL=http://xxx:8080export ACCESS_TOKEN=XXX
配合chatgpt-web使用有奇效,填写OPENAI_ACCESS_TOKEN和API_REVERSE_PROXY即可。
1 2 3 4 5 6 7 8 9 10 11 12 13 14 15 16 17 18 19 20 21 22 23 24 25 26 27 28 29 30 31 version: '3' services: app: image: chenzhaoyu94/chatgpt-web # 总是使用 latest ,更新时重新 pull 该 tag 镜像即可 ports: - 3002:3002 environment: # 二选一 OPENAI_API_KEY: # 二选一 OPENAI_ACCESS_TOKEN: 这里填写 # API接口地址,可选,设置 OPENAI_API_KEY 时可用 OPENAI_API_BASE_URL: # API模型,可选,设置 OPENAI_API_KEY 时可用,https://platform.openai.com/docs/models # gpt-4, gpt-4-0314, gpt-4-32k, gpt-4-32k-0314, gpt-3.5-turbo, gpt-3.5-turbo-0301, text-davinci-003, text-davinci-002, code-davinci-002 OPENAI_API_MODEL: # 反向代理,可选 API_REVERSE_PROXY: http://ip:port/conversation # 访问权限密钥,可选 AUTH_SECRET_KEY: # 每小时最大请求次数,可选,默认无限 MAX_REQUEST_PER_HOUR: 0 # 超时,单位毫秒,可选 TIMEOUT_MS: 60000 # Socks代理,可选,和 SOCKS_PROXY_PORT 一起时生效 SOCKS_PROXY_HOST: # Socks代理端口,可选,和 SOCKS_PROXY_HOST 一起时生效 SOCKS_PROXY_PORT: # HTTPS 代理,可选,支持 http,https,socks5 HTTPS_PROXY: